오늘은 제가 iOS에서 MQTT 통신 연결에 대해서 설명하려고 합니다.
일단 MQTT 통신을 사용한 이유에 대해서 설명할게요!
졸업전시에서 미디어아트를 만드는데 아두이노와 iOS 앱 사이에서 통신이 필요했어요.
아두이노의 실시간 좌표값을 iOS 앱에서 받아야 했기 때문이죠.
그래서 제일 유명한 방법 중에 하나인 Firebase Realtime database 를 사용했는데.... ❌
이게 데이터 전달에서 1~2초 정도의 딜레이가 있어서.. 이 방법을 포기하고 MQTT를 구현하기 시작했다.
MQTT 장점
1. 별다른 장치가 필요없다.
2. 실시간 통신이 가능하다. (딜레이가 X)
먼저 MQTT란?
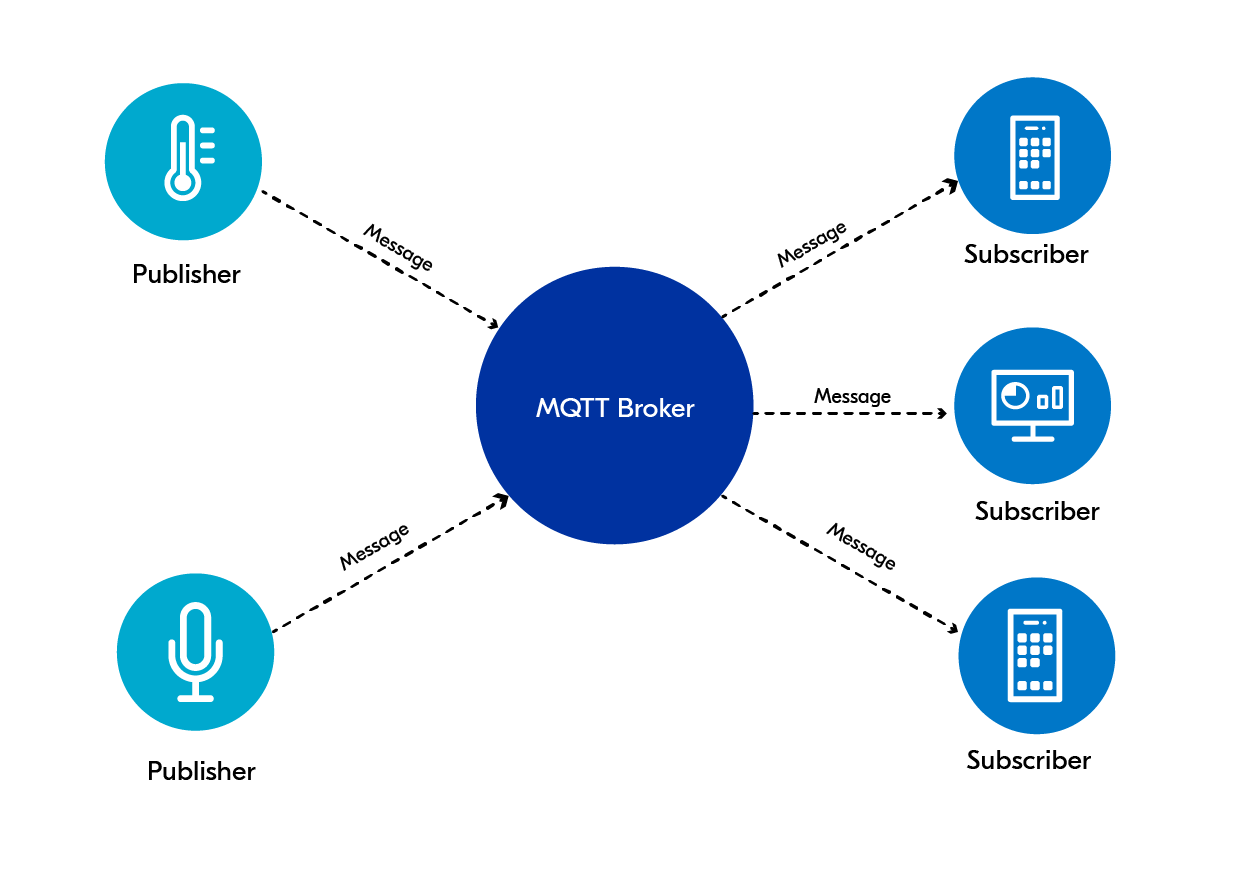
MQTT(Message Queuing Telemetry Transport)는 클라이언트에서 메시지를 발행(Publish)하고 수신(Subscribe) 할 수 있는 시스템이다. 간단한 메시징 프로토콜이기 때문에 사물 인터넷 애플리케이션에 적합하다. MQTT를 사용하면 여러 장치 사이에 명령을 보내 출력을 제어하고 센서 노드에서 데이터를 읽고 게시(Publish)하는 설정을 용이하게 할 수 있다.
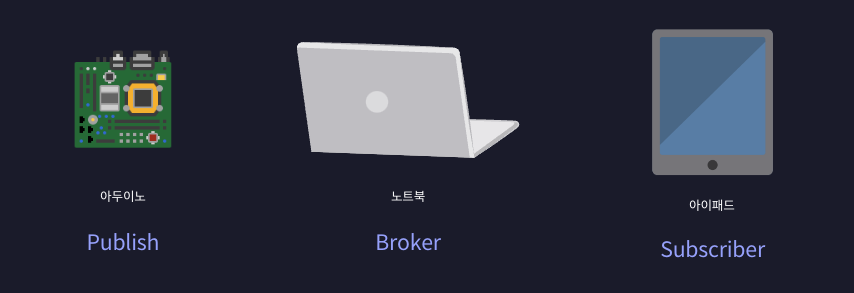
그래서 나는
Publisher ➡️ 아두이노, Broker ➡️ 노트북, Subscriber ➡️ 아이패드 라고 생각하면서 구현했다.
1. Borker 구현 (노트북에 mosquitto 설치)
설치 ⚙️
brew install mosquitto
중지 ❌
brew services start mosquitto
재실행 🛠️
brew services restart mosquitto
비서비스 시작 📂
/opt/homebrew/opt/mosquitto/sbin/mosquitto -c /opt/homebrew/etc/mosquitto/mosquitto.conf1️⃣ Broker 서비스 시작
: 앞의 비서비스 시작 명령어를 통하여 브로커를 실행시켜주자
/opt/homebrew/sbin/mosquitto -c /opt/homebrew/etc/mosquitto/mosquitto.conf
근데 여기서 자기 mosquitto가 어디에 설치되어 있는지 모르겠다면?
경로 찾는 명령어를 사용하면 된다.
which mosquitto

또는

sudo find / -name mosquitto
2️⃣ 해당 브로커의 토픽을 구독하자
👉🏻 mosquitto_sub -h [주소] -p [포트] -t [주제, 방제목]
주소, 포트, 토픽을 맞게 구독했다면 메시지를 publish하면 터미널에 메세지가 쭉 전송됩니다.
근데 이렇게 다 했는데도 pub이랑 sub이 잘 안된다? 밑에 블로그 참고해서 mosquitto 설정을 변경해주세요!
2. Publisher 아두이노 구현
MQTT 관련 아두이노 코드에는 ⭐️ 표시를 해두었습니다.
#include <Arduino.h>
#include <WiFi.h>
// 1. 라이브러리 추가 ⭐️
#include <PubSubClient.h>

// WiFi 설정
const char* ssid = "";
const char* password = "";

// 2. mqtt 서버 설정 ⭐️
const char* mqtt_server = ""; // MQTT server 주소
#define mqtt_topic "topic"    // topic (자유롭게 작성}


// mqtt Publisher 완성 ⭐️
WiFiClient espClient;
PubSubClient client(espClient);    // wifi client를 사용해서 client 만들어주기
int _idx = 0; //MQTT publish msg에 넣을 일련 번호

// ADXL335 핀번호 설정
const int xPin = 36;
const int yPin = 39;
const int zPin = 34;

void setup_wifi() {

  // WiFi 연결 ⭐️
  WiFi.begin(ssid, password);
  Serial.print("Connecting to Wi-Fi");
  while (WiFi.status() != WL_CONNECTED) {
    Serial.print(".");
    delay(300);
  }

  Serial.println("");
  Serial.println("IP address: ");
  Serial.println(WiFi.localIP());
  Serial.println(WiFi.macAddress());
  Serial.println(WiFi.gatewayIP());
  Serial.println(WiFi.dnsIP());
  Serial.println(WiFi.subnetMask());

  client.setServer(mqtt_server, 8884); // 8884는 포트 번호 ⭐️
}

void reconnect() {
  while (!client.connected()) {
    if (client.connect("ESP32")) { // 연결 ID, anonymous
      Serial.println("MQTT Broker connected");
      return ;
    }
    else {
      Serial.println("MQTT Broker connection unsuccessful, retry in 5 sec.");
      delay(5000);
    }
  }
}

void callback(char* topic, byte* payload, unsigned int length) {
  //Serial.print("Message arrived [");
  //Serial.print(topic);
  //Serial.print("] ");
  String msg = "";
  for (int i = 0; i < length; i++) {
    msg +=(char)payload[i];
  }
  //Serial.print(msg);
  //Serial.println();
}


void setup() {
  Serial.begin(115200);
  setup_wifi();
  client.setServer(mqtt_server, 8884);
  client.setCallback(callback);
}

// 전역 변수로 이전 pitch와 roll 값을 저장할 변수 선언
int prevPitch = 0;
int prevRoll = 0;

float prevPitchF = 0.0;
float prevRollF = 0.0;

// 기본 방향 상태 변수
bool isUp = false;
bool isDown = false;
bool isLeft = false;
bool isRight = false;

void loop() {

  while (!client.connected()) {
    //Broker에 연결 시도
    reconnect();
  }

  client.loop();

  client.publish("topic", "up-right"); // topic 자리에 자신의 topic 넣어주기 ⭐️


  delay(400);
}
3. Subscriber iOS 구현
1️⃣ SPM 사용해서 MQTT 패키지 추가
https://github.com/emqx/CocoaMQTT
GitHub - emqx/CocoaMQTT: MQTT 5.0 client library for iOS and macOS written in Swift
MQTT 5.0 client library for iOS and macOS written in Swift - emqx/CocoaMQTT
github.com
2️⃣ MQTT 객체 생성 및 관련 함수 작성
이렇게 객체를 생성해주고 메세지를 전달한 메서드도 작성해줍니다.
import SwiftUI
import CocoaMQTT

final class MQTTManager: ObservableObject {
    private var mqtt: CocoaMQTT?
    @Published var receivedMessage: String = ""

    init() {
        setupMQTT()
    }

    private func setupMQTT() {
        let clientID = "CocoaMQTT-" + String(ProcessInfo().processIdentifier)

        mqtt = CocoaMQTT(clientID: clientID, host: "\(서버 IP⭐️)", port: [포트번호⭐️])
        mqtt?.keepAlive = 60
        mqtt?.willMessage = CocoaMQTTMessage(topic: "\(topic⭐️)", string: "==== Connected iOS")
        mqtt?.autoReconnect = true
        mqtt?.allowUntrustCACertificate = true
        mqtt?.delegate = self
        mqtt?.connect()
    }

    func subscribe(to topic: String) {
        if (self.mqtt?.connState == .connected) {
            print("✅ topic 구독 성공")

            self.mqtt?.didReceiveMessage = { mqtt, message, id in
                print("Message received in topic \(message.topic) with payload \(message.string!)")
            }

        }else{
            print("❌ 구독 연결이 끊어져있습니다.")
        }
    }

    func publish(topic: String, message: String) {
        mqtt?.publish(topic, withString: message)
    }
}

extension MQTTManager: CocoaMQTTDelegate {
    /// MQTT 연결 완료 콜백
    func mqtt(_ mqtt: CocoaMQTT, didConnectAck ack: CocoaMQTTConnAck) {

        // print(":::: didConnectAck ::::")

        if ack == .accept{
            // print(":::: 👏didConnectAck ::::\n")
            // print(":::: 👏브로커 연결 완료 ::::\n")
            self.mqtt?.subscribe("topic", qos: CocoaMQTTQoS.qos1)
        }
    }

    /// 발행 메시지
    func mqtt(_ mqtt: CocoaMQTT, didPublishMessage message: CocoaMQTTMessage, id: UInt16) {
    }

    /// 발행 완료
    func mqtt(_ mqtt: CocoaMQTT, didPublishAck id: UInt16) {
    }

    /// 구독한 토픽 메시지 Receive
    func mqtt(_ mqtt: CocoaMQTT, didReceiveMessage message: CocoaMQTTMessage, id: UInt16) {
        receivedMessage = message.string ?? "No didReceiveMessage"
    }

    func handleReceivedMessage(_ message: String) {
        // 받은 메시지에 대한 처리 로직
        print("메시지 처리: \(message)")
    }

    /// 토픽 구독 성공 콜백
    func mqtt(_ mqtt: CocoaMQTT, didSubscribeTopics success: NSDictionary, failed: [String]) {
        self.mqtt?.didReceiveMessage = { mqtt, message, id in
            //print("Message received in topic \(message.topic) with payload \(message.string!)")
        }
    }

    /// 토픽 구독 취소 콜백
    func mqtt(_ mqtt: CocoaMQTT, didUnsubscribeTopics topics: [String]) {
    }

    /// 연결 상태 체크 ping
    func mqttDidPing(_ mqtt: CocoaMQTT) {
    }

    /// 연결 상태 체크 pong
    func mqttDidReceivePong(_ mqtt: CocoaMQTT) {
    }

    func mqttDidDisconnect(_ mqtt: CocoaMQTT, withError err: Error?) {
    }
}
3️⃣ 메세지 Subscribe
전송 받은 메세지 값이 궁금한 곳에서 프린트를 출력해보면 잘 전송받았음을 확인할 수 있습니다.
 .onReceive(mqttManager.$receivedMessage) { newValue in
    print("📢📢📢📢=== Here: \(newValue)")
}
🗣️ 그리고 노트북에서 사용하는 와이파이와 아두이노에서 사용하는 와이파이가 같아야 합니다!!!!
MQTT를 구현한 iOS 깃허브 링크입니다.
Ressentiment-iOS/Ressentiment-iOS/Ressentiment-iOS/UIKitContentView.swift at main · god-fun-re-fun/Ressentiment-iOS
르상티망 모바일 인터랙션. Contribute to god-fun-re-fun/Ressentiment-iOS development by creating an account on GitHub.
github.com
이렇게 3가지의 구현을 모두 마쳤다면 메세지가 잘 전송되고 구독되고 있음을
터미널 모스키토를 구독하거나 Xcode에서 로그를 프린트를하여 확인 할 수 있습니다.
혹시 구현하다가 안되는 것이나 궁금한 점이 있으시다면 댓글 남겨주세요! 제가 아는 선에서 답변 남겨드리겠습니다!
'iOS > SwiftUI' 카테고리의 다른 글
| [SwiftUI] SF Symbols 색상 바꿔서 사용하기 (1) | 2024.10.07 |
|---|---|
| [SwiftUI] Offset vs Position (+ Padding) (1) | 2024.09.23 |
| [SwiftUI] Image: 이미지 사용하기 (0) | 2024.09.23 |


